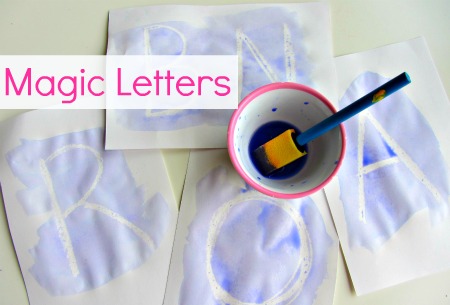
What I was looking for was a more controllable chaos, and I found it in this ‘Mystery Letters’ paint-resist activity that I actually
found on the same website (No Time for Flashcards) as the Name/Tape craft. Lots of good ideas on that
site!
 |
| Activity and photo source |
1) Liquid Watercolors. This is an easier medium than standard watercolor pallets for toddlers since it cuts out the step of dipping the brush in water and then mixing with the solid watercolor paint.
2) Paint tray or other container. I have a paint tray for Forest but since there were so many kids I also just used some of his small snack bowls and dixie cups. A friend of mine uses an ice tray when her little one paints which I thought was pretty genius.
2) Paint tray or other container. I have a paint tray for Forest but since there were so many kids I also just used some of his small snack bowls and dixie cups. A friend of mine uses an ice tray when her little one paints which I thought was pretty genius.
3)Paint brushes with chunky handle. Sponge brushes also worked
really well for this particular craft and I got a pack of 8 at Target for about
$5.
4) Watercolor paper. Um, to me this appears to be just regular paper but
Crayola markets it as special watercolor/marker paper. Whatevs, it was $3 for a
50 page pack and it did the trick.
5) Plastic drop cloth or just a plastic
table cover. Something to protect the splash zone. I had an old wipe-clean
table cloth from Target that we used at Forest’s Halloween Birthday Party and
it worked perfectly.
6) A white crayon. This was harder to find that I thought. White doesn’t come in the standard basic color boxes so I ended up with a 24 pack of Crayolas. I’m sure our little artist will use them at some point in his crafting career. For now he is definitely not allowed to roam the house unsupervised with crayons!
6) A white crayon. This was harder to find that I thought. White doesn’t come in the standard basic color boxes so I ended up with a 24 pack of Crayolas. I’m sure our little artist will use them at some point in his crafting career. For now he is definitely not allowed to roam the house unsupervised with crayons!
Ok, so basically, all you
do is write their name pretty thickly with a white crayon. It can be really
hard to see white crayon on the white paper, so I suggest writing it with some
natural light around if possible. I went over each name a few times to make
sure it was thick enough that the watercolor wouldn’t bleed over it and the
name would be pretty distinct.
Then I filled each paint container with about an
inch of water and then added drops of the liquid watercolor to get the desired
vibrancy.
All the babies had to do was paint over their ‘watercolor paper’ and voila- their names appeared.
All the babies had to do was paint over their ‘watercolor paper’ and voila- their names appeared.
It’s a great tool for teaching name recognition and the
letters that make up their name, plus colors as well.
Obviously, there are lots of different versions of this you could do. I plan on using this as part of Forest’s at home preschool education to feature numbers, letters and colors. You could also draw simple pictures to work on vocabulary too. It’s just a lot of fun for them to get to paint and see a word/letter/number/picture magically appear.


No comments:
Post a Comment